|
3/17/2019 0 Comments Video Downloader Software For Mac
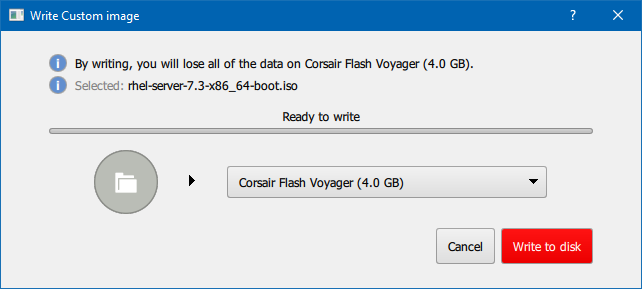
100% Free YouTube Downloader for Mac iSkysoft Free Video Downloader for Mac lets Mac users 3X faster download any videos from YouTube. You can save your favorite YouTube videos, even 4K UHD YouTube videos, to your Mac instantly. It's important to note that the appropriate /dev/disk# should be determined by using the following command on the macOS command line: diskutil list In the question above, the USB device mapped to /dev/disk2 whereas the example above uses /dev/disk1. I didn't convert the ISO to img, I just formatted a USB drive for FAT and used dd: sudo diskutil unmountdisk /dev/disk1 sudo dd if=./debian.iso of=/dev/disk1 bs=1m I tested this with Debian 9. It automatically detects the videos on YouTube opened in Safari, Chrome or Firefox and allows you to download YouTube videos with a single click. It supports downloading YouTube videos in batch and has the ability to shut down your Mac or let it enter sleep mode when the download is finished. Download videos from 1000+ sites YouTube, Facebook, VEVO, Vimeo, Dailymotion, Break, Metacafe, LiveLeak, Aol, TED, Comedycentral, MTV, CBS, Yahoo, BBC, VH1, ESPN, BlipTV, WatTV, VideoBash, FunnyOrDie, The NY Times, Adult sites, etc. For more supported sites in iTube Studio for Mac, Convert videos to any formats and devices Convert videos to any other popular video formats like MPG, MPEG, MP4, 3GP, WMV, MOV, AVI, MP3, M4A, WAV, MKA, etc. And download videos to fit any popular devices such as iPad, iPhone, iPod, PSP, Apple TV, Zune, Android, and more. Convert YouTube to MP3 Extract audio from YouTube videos in MP3 format or directly download YouTube to MP3. One-click to download video Download YouTube videos from browser in only a single click. Download video with URL Quickly capture video with just the video URL Batch download YouTube videos Download multiple YouTube videos at the same time. Download all videos from YouTube channel and playlist. Shut down your Mac When the video download is finished, it can automatically shut down your Mac. YouTube Video Downloader Software for Apple Mac PC YouTube video downloader software for Mac with easy navigation menu with three buttons which display the main features. Either enters a URL or copy and paste the link or the YouTube link which open in a browser will automatically detect in the URL area. YouTube video downloader is completely free software to download videos so that you can enjoy seeing them offline. 
Fortunately, Free Video Downloader for Mac software is an effective way to download and convert videos for Mac. Being compared with the online application, the professional software excels at its accelerated downloading speed, expanded video formats, great stability and more complete functions. YouTube video downloader software supports all Mac PC and laptop, it supports all version of Mac operating system. It is the easy way to browse, download and convert any videos from streaming sites. Download 10,000 of videos from the most popular websites like YouTube, Vevo, Vimeo, Dailymotion etc and convert them into to MP3, AVI, MKV, WMV format or convert it for Apple iPhone, Apple iPod, Apple iPod and all apple devices. How to Download YouTube Videos for Apple Mac: Video downloader software is a very fast, easy and very user friendly to download videos from any video sharing website very quickly. YouTube video downloader is completely free ware software and 100% secure its not containing any kind of spyware, malware or any virus and you don’t require technical knowledge to run this application. Users can edit and change the download location and user have the options to convert any YouTube videos into many formats. Fastest dvd burner for mac. Now you can browse and download any videos from any websites and convert your downloaded videos to Apple iPad, Apple iPod and Apple iPhone.
0 Comments
3/17/2019 0 Comments Signal Extension For Chrome MacSkip this step if you're not going to customize policies for specific apps or extensions. To apply policies and settings to a specific Chrome app or extension, you need to identify it. 
Signal — Private Messenger for Windows, Mac, and Linux - signalapp/Signal-Desktop. Chrome development master v1.15.x Nothing to show. V1.19.0 v1.19.0. You can donate to Signal development through the Freedom of the Press Foundation. 2018-12-19 open /Applications/Google Chrome.app --args --enable-easy-off-store-extension-install now you are allowed to install extensions (crx files) that are not in the Chrome Web Store during this session of Chrome. Every app and extension in the Chrome Web Store has its own unique identification (ID) that doesn’t change across versions. So, if a user installs a specific app or extension on multiple devices, it has the same ID on all devices. Each ID is 32 characters long. To find an app or extension ID: • Open the. • Find and select the app or extension you want. • Look at the URL. The ID is the long string of characters at the end of the URL. For example, nckgahadagoaajjgafhacjanaoiihapd is the ID for. Step 4: Set app and extension policies. • allowed—Users can install apps and extensions from the Chrome Web Store. Western digital hard drive software to format for mac mac. If no installation mode is defined, this is the default. • blocked—Users can’t install apps or extensions from the Chrome Web Store. You can define a custom error message that lets users know it’s blocked (details below). • force_installed—Automatically install extensions that you specify without user interaction. Users can’t disable or remove them. You also need to define the extension download location (details below). • normal_installed—Automatically install extensions that you specify without user interaction. Users can disable them. You also need to define the extension download location (details below). Example installation code that contains the example. You can edit it using a text editor. The example shows how to: • Automatically install Google Hangouts (nckgahadagoaajjgafhacjanaoiihapd) and Google Keep (lpcaedmchfhocbbapmcbpinfpgnhiddi) on user devices. • Allow users to disable Keep but not Hangouts. • Allow users to install Google Calendar (gmbgaklkmjakoegficnlkhebmhkjfich) from the Chrome Web Store. • Prevent users from installing any other apps or extensions. ExtensionSettings * installation_mode blocked nckgahadagoaajjgafhacjanaoiihapd installation_mode force_installed update_url lpcaedmchfhocbbapmcbpinfpgnhiddi installation_mode normal_installed update_url gmbgaklkmjakoegficnlkhebmhkjfich installation_mode allowed. The example shows how to: • Display a specific message for Google Calendar (gmbgaklkmjakoegficnlkhebmhkjfich). • Display a generic message for all other apps and extensions. /005_hardware-acceleration-in-chrome-4125122-5c199ed546e0fb0001621377.jpg "For")
ExtensionSettings * blocked_install_message Contact IT admin for help. Cdacconmaakjimmfgnblocblbcdcpbkn blocked_install_message Instead, please call IT for help. Installation_mode blocked. The format of host patterns is [http|https|ftp|*]://[subdomain|*].[hostname|*].[eTLD|*], where • [http|https|ftp|*], [hostname|*], and [eTLD|*] are required, and • [subdomain|*] is optional. Valid host patterns Matches Doesn't match *://*.example.* *://* All Urls Invalid host patterns • • http*://example.com • • • Example code to prevent webpage modification that contains the example. You can edit it using a text editor. After you deploy any Chrome extension policy, check user devices to make sure the policy was applied correctly. • On a managed Chrome device, browse to chrome://policy. • Click Reload policies. • In the top right, in the Filter policies by field box, enter ExtensionSettings. • Check the Show policies with no value set box. How to access extensions in chrome for mac. • Under the Chrome policy name next to each extension setting, make sure Status is set to OK. • Click Show value and make sure the value field isn’t empty. Related topics • • •. 3/17/2019 0 Comments Emulator For Windows 10 MacMar 30, 2018 - Just because you're using a Mac, doesn't mean you're forced to use macOS all of the time. You can have your cake and eat it too! Bluestacks For PC / Android Emulator For Windows 7, 8, 10 & MAC OS X April 3, 2017 Polio Fernandes Apps, Games Here we will look at the Need of Bluestacks emulator with the brief description about the App player and then we will move forward to the Download and Install Steps of the Emulator and the ways in which you can play the Android Apps. There are a variety of motives why someone needs to run Android emulators on their laptop or MacBook. Similarly, game enthusiasts may want to play with mouse and keyboard on their mobile video games. Or perhaps you merely need it there on your system. Lots of these emulators are almost the identical manner. All you need to do is find the one works best android emulator for you. The hassle with Android emulators is that numerous them are finicky and generally tend not to work as advertised. We test and tried to get more than a dozen emulators which we think are best among many. You must strengthen your Printer Drivers typically to keep up your current products, one example is, any first printer operating correctly. Coby mp620 software. When you have the necessary things, it is straightforward to view most of the Printer website with regards to your particular custom-made drivers as well as, need to obtainable, download and set up of these kinds of drivers. If you're switching from PC to Mac and aren't comfortable with the big change yet, if you're a dual-computer user and want to work on both Windows and macOS, or if you just want options, you can run Windows on your Mac and have the best of both worlds on one screen. There are a couple of options out there for getting Windows on your Mac, and even older Macs can support Windows if you know the trick. 
Here's my advice for the best way to run Windows on your Mac. • • • • Running Boot Camp is the best if you have the space Installing a licensed copy of Windows on your Mac's internal hard drive by partitioning it and using Boot Camp is the best way to run Windows on your Mac. The main reason is performance. When you've got Windows directly on your internal drive, you don't have to jump through all of the additional communication lines the way you would using an external drive or a virtual machine. This is especially important for gamers. If you're playing a Windows game on your Mac, the last thing you want is lag. It's a killer (digitally literally). Having Windows right on your internal hard drive is more stable and reliable. If your Mac has plenty of internal storage (at least 32GB, but really, much more), you should consider partitioning your hard drive and installing Windows using Boot Camp. Running a virtual machine works great and you don't need to partition your hard drive Though I recommend installing Windows on your Mac's internal hard drive, that doesn't mean there aren't alternative methods that aren't just as awesome, even if a little (very little) slower. That's where virtual machines come in. A virtual machine is a software simulation of a real operating system. You can install a virtual machine on your Mac just like any other program. 
The Network and Sharing Center While it requires a few more steps and clicks, those not comfortable with the Windows Command Prompt may prefer to get the MAC address via the graphic interface of the Network and Sharing Center applet of the Windows Control Panel. To open the Network and Sharing Center, click the Start button and type Network and Sharing into the search box. Under Control Panel an entry should appear for Network and Sharing Center. Clicking on it should open the Network and Sharing Center control panel applet. The Network and Sharing Control Panel Applet From the list of 'active networks', click on the text next to the label 'Connections' as indicated in red in the above image. This will open the Connection Status properties page. The Connection Status Properties Page In the section marked 'Connection', click the button labeled 'Details' (as indicated in red above) to open the Network Connection Details property page. If you downloaded Windows 7 from the Microsoft Store, it is offered in two ways: - 3 separate files in the.BOX format -.ISO image ----------- If you downloaded.BOX files, you can't prepare those in Mac OS X, you would need to go to a Windows machine. If you downloaded the.ISO file, then you could burn it to a blank DVD in Mac OS X using Disk utility. 
Go to Network & Internet -> Ethernet if you need to find the MAC Address of your Ethernet adapter. Click on the network name to see its properties. On the next page, you will find the line Physical address(MAC). It is the MAC Address value you are looking for. Find the MAC Address in Command Prompt. It is possible to find the MAC address in Windows 10 using a couple of console commands. If the modem has an assigned IP address, you can find the MAC address using the ping and arp command: Ping the device: ping 1.2.3.4; View arp table: arp -a; The MAC address information is pulled by the ping command, and the info is temporarily stored in your NIC. The arp command is to show the stored information. The Network Connection Details Property Page The MAC address can be found labeled as the 'Physical Address'. Although it is not immediately apparent, it is possible to use Cntrl-C to copy the text of this dialog to later paste into an email or a text document so that it is not necessary to transcribe the MAC address manually. Lmtools: a Separate Download For those more comfortable downloading a tool to run to ensure that the appropriate information is captured in the correct format, we offer the lmtools program for download. It does not require installation, it is a standalone program. To use lmtools to get the MAC address, first download the (1.5MB) program to your PC. Then run the program from the location you downloaded it to. From the 'System Settings' tab, choose the option marked 'Save Host ID Info to a File'. In the 'Save As' dialog, enter an appropriate filename for the resulting text file (e.g. Western digital hard drive software to format for mac mac. 'hostinfo.txt') For users planning to directly submit an evaluation license request via email, please attach the resulting text file to the email. For those planning to use the, the recommended procedure is to open the text file and locate the section titled 'Ethernet Address'. Immediately below that label will be one or more 12 digit hexadecimal strings, possibly enclosed in quotation marks. Please use that information to fill out the appropriate data field. 3/17/2019 0 Comments App Player Mac Os XLooking to make the most of the robust? We’ve got you covered. There are literally hundreds of thousands of great software applications compatible with MacOS in the App Store — not to mention the thousands more that are scattered across the web. Because of this, we’ve compiled some of the best Mac apps available. How to access extensions in chrome for mac. While TextWrangler is still available in the Mac App Store, it’s no longer supported by BareBones. BlueStacks is one of the best Android emulators so far, and it gives support for both OS i.e., Windows and Mac OS. Previous, we have published BlueStacks 3.0 for Windows and BlueStacks rooted version for Windows users, but today is for Mac OS users. Since there are so many apps, we pared our list down to only include programs that are most likely to be useful to the average Mac user, whether you’re looking to quickly access an abundance of RSS feeds or automatically upload your photos to the proverbial cloud. Interface Alfred 3 Think of Alfred as Spotlight with a dash of Siri. It’s an application launcher, but it can do a lot more than just that.

Bartender 3 ($15) Bartender 3 is an app made for when you’re utilizing too many apps. It’s a subtle tool that’s specifically designed with organization in mind, and as such, it lets you better systematize various aspects of your interface. With Bartender 3, you choose which apps appear in the menu bar and rearrange their position to your liking. You can also search for specific items, or move them into the optional Bartender Bar if you’re in dire need of additional space. The latest version added support for MacOS, an interface that leverages the new operating system, and the ability to navigate via your keyboard. You can choose a 4-week free trial before purchasing if you want. Amphetamine Always a favorite, Amphetamine keeps your computer from going into sleep mode, starting the screensaver, or performing the auto-dim function. It’s ideal for watching streams, videos, or any other activity in which you don’t touch the keyboard or mouse for an extended period of time. Note that Amphetamine no longer works with older versions of the operating system like Yosemite. Dropzone 3 ($10) Once installed, Dropzone 3 feels like an integral part of MacOS. The bare-bones application functions as a shortcut tool, meaning you can use it to quickly copy and move files, launch applications, and share content through popular services such as Facebook and Flickr. You can also upload files via FTP and Amazon S3, or shorten URLs using the newly-added Goo.gl shortener. It’s all housed within a tiny icon that sits in the menu bar. Google Chrome Safari will never boast the kind of intuitive integration afforded by Google’s proprietary browser. Chrome is for desktop platforms, one that also features the ability to automatically sync all your information — bookmarks, open tabs, recent searches, etc. — across multiple computers and mobile devices. That, combined with its robust customization and instant search capabilities, make it worthwhile. Magnet ($1) It’s not always easy to view multiple windows side by side, at least, not without Magnet. The app is made for the multitasker inside all of us, and thus presents a quick way to arrange your desktop. Format western digital hard drive software. With Magnet, you can drag and snap windows to the edges and corners of your screen, which will then lock into place. It’s a terrific tool, complete with predefined keyboard shortcuts, if you want to copy content from one app to another. Unclutter ($20) Unclutter is a basic piece of software that suits its name. The app is accessible with a quick swipe from the top of your screen, and, better yet, functions as a convenient place for storing quick notes, recent files, and clipboard information. Recent updates also allow for a light or dark theme (although MacOS Mojave now has a native dark mode), and include an option for dragging cards on top of other desktop windows. If you have a Mac and use storage devices like a USB drive of a different format than that recognized by Mac, you pretty much know that it is difficult to format it. The reason behind this is that most USB drives are designed to work on Windows OS, which runs on the FAT32 system. The Mac devices run on either APFS or Mac OS Extended. So, if you have a drive that is Mac OS extended or APFS format, you can easily reformat your drive, but if the drive has a FAT32 file format, then you might be in problem. Mac can read and write on the FAT32 file format, but it will definitely give you some quality issues. But not worry if you have bought a flash drive that runs on a different format than what is preferred by Mac. Below are some easy steps that will guide you to format these drives to Mac OS and APFS. This page offer 7 best ways to fix USB flash drive not recognized problem on Windows and Mac,and the best way to recover lost data from Flash drive. Right-click on the flash drive and click on Format'. Recover Lost Mac Data under Mac OS X 10.13 (High Sierra) Due to macOS High Sierra (macOS 10.13) requirement, Mac users are not allowed an. Image source: – maxupgrades. Accidental file deletions or file corruptions can be a serious problem, especially when we are not relying on cloud services. How To Format A USB Drive On A Mac? To format a USB drive, follow these steps: – • Connect USB drive into the given socket. 
The latest MacBook Pro or another MacBook has only USB-C type connectors, so if you have the recent Mac’s, you will require an adaptor to convert from USB-C to USB-A. • Click the fresh Finder window. Then select the drive. Note: – Formatting will wipe the entire data, so make sure the drive contains no important data on it. Copy any crucial data on your Mac. • Next navigate to Applications and select Utilities, then select Disk Utility by double-clicking on it. • From the sidebar menu, select USB drive. Now select Erase from toolbar that is situated at top of window. • Next a window will drop down; here type a specific name for formatted drive. • Next from the drop-down menu, select the type of format you want. • If the USB flash drive, has some sensitive data, click on Security tab. This will let you choose how securely you want the files to be deleted. • Just move the slider to right, the further it moves, the more passes the erase feature will make meaning that the files will be removed discreetly. But keep in mind this step will increase the time of the format. • Finally, click on OK and then select Erase. 
This is a complete process of formatting a USB drive on Mac. Don’t buy a new machine when you can upgrade your MacBook Pro with an SSD. Read and know the step. While Reformatting A USB Drive, Which File Format Should Be Used? Image source: – engadget Depending on the currently running version of Mac- MacOS high Sierra or older, there are two available choices for file format- Mac OS Extended and APFS. Now, below are some pointers that will help you to select the best format according to your requirements: • If you have a Mac that runs the operating system (macOS) older than High Sierra, then it is crucial to format a thumb drive using the Mac OS Extended format. The reason behind this is that a reformatted disk in the APFS file format, will not load in the Mac. • If you are planning to format a flash drive on a Mac, select the APFS format as they are SSD (solid state drive) optimized. Even if you consider reformatting a hard drive, APFS is a better option as it is fast and reliable. • If you are going to utilize USB drive for Time Machine backups, then go for Mac OS Extended. This is because APFS disk doesn’t support Time Machine backup and even if you use this file format, it will give the option to reformat USB drive with Mac OS Extended. • However, any APFS formatted drive can be backed up to a Mac OS extended Time Machine drive. Steps To Format A USB Drive To Fat32 On Mac: Before we learn how to format a USB drive to FAT32 on Mac, it is necessary to learn why to do? And the reason behind this is as follows: – • FAT32 format can be read and written to on both the operating system- Mac and Windows. • There are many people who like to use the drive on both Mac and Windows, and others use it as a device for storage for TV shows and thus reformatting to FAT32 is necessary. • The only limitation with FAT32 is that the individual files should have a 4GB size and not more which poses a problem when USB drive has bigger size files. • However, in such cases, exFAT can be used as it no such limitation and can run on OS. Beyond macOS skin, there’s a whole another world known as Mac command line. 3/8/2019 0 Comments Mp620 Software For MacCanon PIXMA MP620 Driver Download For Windows and Mac - The MP620 does provide some improvements, too. It adds both Ethernet and also Wi-Fi. Nonetheless, the Canon PIXMA MP620 is significantly slower than the Canon PIXMA MP620, as well as it does not have the MP620's automatic duplexer for printing on both sides of the page. Further, print speed of this printer is also reasonable and reliable. The print speed of black text is up to 26 ppm (2.3 second/page) and the color one is 17 pp, (3.6 seconds/page). For a borderless 4x6 photo, it need at about 41 seconds. As this printer serve as copier and scanner, the attractive copy features and scanner feature are already available. See Also: Inkjet Printer & Driver Download Canon PIXMA MP620 Specifications • Print Speed (up to): 4 x 6 borderless photo: approximately 41 seconds6/ Black: Up to 26/ ppm (as fast as 2.3 seconds per page)6/ Color: Up to 17 ppm (as fast as 3.6 seconds per page)6 • Number of Nozzles: Black: 320/ Color: 2,048/ Total: 2,368 • Picoliter Size (color): 1, 2 and 5 • Print Resolution (Up to): Black:600 x 600 dpi5/ Color:9600 x 2400 dpi5 • Paper Sizes: Letter, Legal, 4 x 6, 5 x 7, 8 x 10, U.S. #10 Envelopes • Automatic Sheet Feeder: Cassette: 150 Sheets • Copy Speed (up to): Black: Up to 24 cpm (as fast as 2.5 seconds per page)6/ Color: Up to 16 cpm (as fast as 3.8 seconds per page)6 • Reduction / Enlargement: 25% - 400% • 4 in 1 / 2 in 1, AE (Auto Exposure / Intensity Copy), Borderless, Face Brightener/ Fading Correction, Fit-to-Page, Image Repeat, Intensity, Manual Color Adjustment, Masking Copy, Multiple Copy (1-99 pages), Preset Copy Ratios, Photo Reprint, Trimming Copy, Zoom • Scanning Element: Contact Image Sensor (CIS) • Max. Resolutions: Optical:2400 x 4800 dpi/ Interpolated:19,200 x 19,200 dpi • Scanner Features: Auto Scan Mode7, Gutter Shadow Correction, Network Scan, Push Scan, Scan to Memory • Color Depth: 48-bit internal/24-bit external • Max. Here Are The Steps of How to install Canon PIXMA MP620 Printer For All Devices How to install Canon PIXMA MP620 Printer For Windows A. Automatic installation Your job is nearly done, if your canon printer driver for windows is a Plug and Play device. Because you can just connect it and then wait for it. The Windows System will install all what it needs automatically. Some printers require you to install the software before you can completely connect them, although most printers can be immediately connected on to your computer. 
Manually installation You can follow these steps if you need to install the canon printer driver for windows manually: • First, choose Start? Then click Control Panel? Look for Printer? Click Add a Printer. • Add Printer Wizard? Click the Add a Local Printer option? It will appear in the Add Printer Wizard. • Select the specific port for the Windows system, to use for the printer? Then click Next? Click the down arrow on the box of “Use an Existing Port Field”? Select the necessary port, if you already know that you need to use a specific port. But if you aren’t sure, you can just use the recommended port setting that Windows that selects for you? 
Select a Printer Port dialog box. • Then in the next wizard window? Choose your printer’s manufacturer? Choose a printer? Sierra brings support for HEVC standard videos which is the most efficient and high definition video coding standard nudging the Mac, while keeping the videos keep streaming better, yet with less size on the disk. Free Mac LightScribe Software. Below are the latest Free Mac LightScribe Software downloads of the: LightScribe System Software (LSS) and LightScribe Simple Labeler. LightScribe System Software LSS Mac (OSX 10.3.9 or later) Click the Download Now link below to download the latest LSS for Mac released by HP on July 2, 2012. Version: 1.18.27.10. As the technology evolves there are some new features brought to the technological devices. Apple has been famous for bringing something new to the store since the beginning. We all know the struggle when we upgrade our system to the latest software we have to deal with the issue of or the folders have been disabled permanently. 
High Sierra is the recently introduced operating system for Mac that has been developed with the some of the remarkable features. Safari is now capable of blocking all the ads and auto-play video that might be disturbing you, Apple file system for secure and quick transfer and many other features. Some of the DVD rippers have shown 'can't open' or 'not work properly' issues with the latest macOS 10.13. Here we have for you the. Part 1: Best DVD Ripper for macOS High Sierra If you are seeking for the best video output quality, fastest video conversion speed, and the most formats supported, is your best choice, which always keeps instant updating and is often among the first DVD rippers supporting the latest Mac operating system. It works on macOS 10.13 High Sierra, macOS 10.12 Sierra and earlier without any trouble. Here are some of the amazing features coming from the top DVD ripping software for macOS High Sierra. 
Specifications • Intelligently handle DVD conversion on macOS 10.13 High Sierra in unmatchable ripping-converting speed while preserving HD quality • Rip DVD to a variety of formats whether they are old or new like MP4,, FLV, WMV, MOV, MKV, MP3, etc. By using its codec library • Support 180+ ready presets for portable multimedia devices like iPhone, iPad, Android, TV, editors, VR headsets, game consoles, etc. • 1:1 Backup DVD movies with original structure or copy DVD to lossless mkv only on macOS High Sierra • Use legal methods to bypass protection in any kinds of DVD or • Support 4K Ultra HD output format for 4K players, 4K TV, 4K tablets/phones • You can send the ripped files to TV or smart movile devices wirelessly • Developed with built-in video editor that will allow you to edit/touch up DVD videos as you like • Built-in media player to play DVD discs and it supports ripping DVD with desired subtitles or audio tracks keeping Quick processing The ripping speed of the program is amazing. You will never have to wait once you have selected the DVD title for conversion. To boost the speed it has hyper-threading technology that will allow you to convert DVD on macOS High Sierra within 5 mins. Easy to use This DVD Ripper for macOS 10.13 is very easy to download and install. You will not require any special skills to make it possible. It has a user-friendly interface that will allow you to understand the software quickly. You will easily know how to use the features and there are easy instructions on using the software. For ripping the DVD you will need to follow the given three steps: P.S. For those who want to convert and rip DVD files on Windows ( included) PCs, please turn to. People have downloaded it. Step 1: Load the DVD Install and run best macOS High Sierra DVD ripper, click the 'Add DVD ' button to load your DVD movies to the program. When all the DVD titles are loaded, you can select the subtitle and audio track as you like to preserve in the output file. Step 2: Select output format Click the 'Select Format' bar, go to the 'Format' profile list or 'Device' column to pick up a suitable format. If you want to tweak the output, you can adjust video audio parameters like video resolution through 'Settings' icon as well as click Edit to trim, crop, expand videos or add effects/watermarks. Step 3: Start the DVD conversion With all settings, click the 'Start' button to rip DVD to a proper format on macOS High Sierra. Or directly click 'Add DVD > Copy DVD Disc to Folder', then press 'Start' to begin copying the DVD disc to BDMV folder, including the menus, titles, ads, etc. By| Mar 21,2018 17:43 pm As a Western Digital hard drive user, you may have the habit to store most of your digital media in the hard drive. The big capacity make it convenient to store your file and take it to anywhere. But it has a fatal defect that if you mistakenly deleted some important files from the hard drive, you possibly can not recover them from trash. Does it mean that you will lost the files forever? No, we have a solution to recover files from Western Digital external hard drive easily. Also with this method, you do not need to worry about the data loss led by virus attack, power loss, accidental formatting or any other factors. • • • Part 1. Western Digital External Hard Drive Recovery Software. It is considered as the best Western Digital data recovery mac software (macOS 10.12 Sierra supported), which is able to pull back any documents, audio, videos, pictures, and any other deleted files from any Western Digital hard drives. This Western Digital hard drive recovery software can go back to the previous state before the hard drive is broken. Then, it can restore all files to Mac computers, especially when the hard drives cannot be used anymore.  
Another benefit of using this western digital recovery software is its ability to work with any storage devices like memory cards, USB drive, external hard drives and more. Step-by-Step Guide to Recover Files from Western Digital External Hard Drive on Windows Step 1. Download and Install the Software Visit the website of iSkysoft Data Recovery to download Windows operating system version. Continue with the installation procedure like a regular program or Windows PC. After finishing, launch the software. As the main interface appears on the screen, you will notice 6 different file type options. Click on the file types you want to recover, and then click 'Next' button. Recover Files from Western Digital External Hard Drive on Windows Upon completion of scanning, iSkysoft Data Recovery for Windows will display all the recoverable content categorized according to files format. You can select the necessary files from the left pane of the screen and have a peek at the content in the preview screen to the right. You can have the necessary files and press the 'Recover' button. A small pop-up appears asking you to select the destination path. Choose a folder on your computer and wait for the program to complete the process. To make your Western Digital hard drive work on both Mac and Windows computers, you need to format the drive with the FAT32 file system. Although both operating systems can format your drive with. • • Data Recovery from Western Digital • A smart technique to retrieve complete data from the Western Digital storage drives • Run the application and recover files on external drives in quick steps • Restores all types of data including - text, media, audio, video files etc. • A user-friendly tool that is compatible to run on both Mac and Windows OS environments • Also supports data recovery on all other brands of external HDD, internal drives, SSD's, Flash Drives, FireWire Drives and so on Have you also encountered data loss issues with Western Digital HD? Data loss from Western Digital hard drives can happen due to numerous reasons. Although there is no manual way to recover data from Western Digital HD, you need not panic. The Western Digital Recovery will help you to recover Western Digital hard drive data in a few simple steps. 3/8/2019 0 Comments Fastest Dvd Burner For Mac
Aimersoft DVD Creator is definitely the best solution. No matter it's a downloaded video or a camcorder video, you don't need to worry about the compatibility issues since this DVD burner can convert virtually any SD and HD video files to DVD. Oct 8, 2015 - Get troubled and irritated by the snail-speed of your DVD burning software? Try the fastest DVD burner to save more time for quality life now. Hi, I'm trying to find the best DVD-Writing software out there. When I was using Windows I was using ConvertXtoDVD and was able to encode and burn home movies from VHS in about 30-35 mins. I'm currently using Toast 11 on Mac as I researched it and apparently this was the best but encoding the same video files takes at least 1-1.5 hours. I've checked the settings and even changed the encoding speeds etc but it still is pretty poor. Is there anything out that that can encode and burn just as quick as ConvertXtoDVD but for Mac? I've tried running through Parallels for ConvertXtoDVD but the performance isn't as good (about an hour) and last resort is to set up dual-boot through Boot Camp. I'm using a MacBook Pro Late Sept 2011 (i5 2.4Ghz) with Mavericks latest version. Apple Footer • This site contains user submitted content, comments and opinions and is for informational purposes only. Apple may provide or recommend responses as a possible solution based on the information provided; every potential issue may involve several factors not detailed in the conversations captured in an electronic forum and Apple can therefore provide no guarantee as to the efficacy of any proposed solutions on the community forums. Apple disclaims any and all liability for the acts, omissions and conduct of any third parties in connection with or related to your use of the site. All postings and use of the content on this site are subject to the. Some people may have heard of Blu-ray movies or even have viewed some. The movie quality is rather impressive, if you have watched Blu-ray DVDs. Currently, Blu-ray discs are still relatively expensive. And for movie enthusiasts, the excellent audiovisual experiences produced by Blu-ray DVDs are unreplaceable. So, you may wonder why not create Blu-ray movie discs on computer. Things are not as simple as you thought. Although most modern computers have a DVD drive that has the capacity to burn DVDs, you need a Blu-ray burner to create Blu-ray DVDs. Fortunately; some venders have released several affordable Blu ray Burners for customer market. In this post, we will share the best Blu-ray burner based on our testing and comparison. The Best Blu ray Burner Software Top 1. Tipard Blu-ray Creator As you can see, most Blu ray Burners on the market do not combine software. So, when you burn Blu-ray on your computer, you also need excellent Blu-ray creating software to work. At this point, we recommend Tipard. It is able to create Blu-ray disc/folder/ISO file with any 4K UHD/HD/SD video in format like MP4, AVI, MOV, M4V, MKV, M2TS, MTS, TS, WMV, FLV, M4V, etc. Blu-ray Creator is compatible with most internal and external Blu ray Burner firmware on the market. The built-in editor provides multiple video editing features and video effects. 
You can customize your Blu-ray disc and add personal audio track, subtitle and menu on Blu-ray DVDs. With Blu-ray Creator, you can get the highest quality of Blu-ray disc possible. Express Burn Express Burn is a versatile Blu-ray burning application available to both Windows and Mac OS X. Its basic features include: • 1. Burn AVI, MPG, MP4, WMV, VOB or other video formats on Blu-ray discs and DVDs. Create audio CD with MP3, WAV, WMA and other audio files. Write data and documents on DVD or Blu-ray discs. Copy DVDs to Blu-ray discs. It supports a wide array of input formats and disc formats. The output quality is among high rank. It does not work on encrypted DVDs or Blu-ray discs. |
AuthorWrite something about yourself. No need to be fancy, just an overview. Archives
March 2019
Categories |
 RSS Feed
